Using Truffle L2 Boxes to Bridge Blockchain Networks
Building dapps that interoperate between L1s and L2s can be difficult. Let's look at using the Optimism Bridge Truffle Box as an easy way to bridge Et
Table of contents
- Running a Multi-chain Dapp Using Infura and Truffle Boxes
- Truffle Boxes
- Prerequisites
- Step 1 — Create an Infura account to access the network
- Step 2 — Setup and Installation
- Step 3 — Bridging using Truffle L2 Boxes
- Step 4 — Complete compilation, migration, and bridging of a contract between Ethereum Goerli and Optimism Goerli
- Step 5 — Verify project is successfully on the Goerli testnet with Block Explore
- Conclusion
It's well known that many blockchains have scalability and congestion problems. These issues have wide-ranging effects from slow transaction times, to increased transaction fees, and degraded user experience.
One solution is for web3 to be multi-chain using L2 (layer two) chains. Ethereum L2s, such as Optimism, Arbitrum, and Polygon, build on top of the Ethereum network but are faster and cheaper than Ethereum. As a tradeoff, however, they are often less secure than Ethereum. That's why L2s handle the day-to-day user activities, while still relying on Ethereum L1 as a behind-the-scenes foundation for a secure and decentralized settlement and data availability layer.
This is a great solution - however, there are many L2s on Ethereum alone, each one a standalone network with its own nuances and experiences. Building and using dapps that interoperate and move between these networks and Ethereum L1 can be tedious, difficult, and a poor experience for users and developers.
What we need is for web3 to become a multi-chain experience, where consumers don't need to know which chain they are using (and frankly, don't care) and where developers can rely on whatever network best supports their dapps' needs. By moving to this multi-chain internet of blockchains, web3 becomes a better experience for everyone involved.
Unfortunately, allowing dapps to move between chains is a difficult technical challenge. In this article we'll look at one solution - using Infura RPC endpoints and Truffle Boxes to build on, and bridge these networks seamlessly. Specifically, we'll use the Optimism Bridge Truffle Box to create a project on the Ethereum Goerli testnet and bridge to Optimism Goerli.
Running a Multi-chain Dapp Using Infura and Truffle Boxes
Truffle Boxes
As the core of our example solution, we’ll rely On Truffle Boxes — “shortcut” boilerplates (such as contracts, libraries, modules, even fully-functional dapps) from ConsenSys that you can use to build your dapp. For multichain solutions, they build on top of Infura RPC Nodes for many of the L2 networks.
As mentioned above, we’ll specifically rely on the Optimism Bridge Truffle Box. This box has all the contracts needed to interact with the Optimism bridge from both L1 and L2, and a set of migrations for deploying, calling functions, and passing messages/values between the layers. It even has a helper script that does everything we need to see this all in action. We simply need to unbox it to get everything we need! The box includes:
An L1 contract that sends a message over the Optimism bridge
A migration that sends a message from Ethereum to Optimism
An L2 contract that sends a message over the Optimism bridge
A migration that sends a message from Optimism to Ethereum
A script to automate compiling contracts, running migrations, and sending messages
A script to automate sending ETH and DAO across the bridge
Note: a bridge is a tool that allows independent blockchains to communicate with each other, send tokens, NFTs, etc.
Prerequisites
Before getting started, we need the following prerequisites:
Node.js and its package manager NPM.
- Verify we have Node.js installed by using the following terminal command:
node -v && npm -v
Basic understanding of JavaScript and Solidity
Step 1 — Create an Infura account to access the network
Once you have the prerequisites taken care of, visit the Infura website to log in (or sign up for a new account).

After successfully signing up, the page redirects to the Infura dashboard, where we can create a new API key, as shown below.
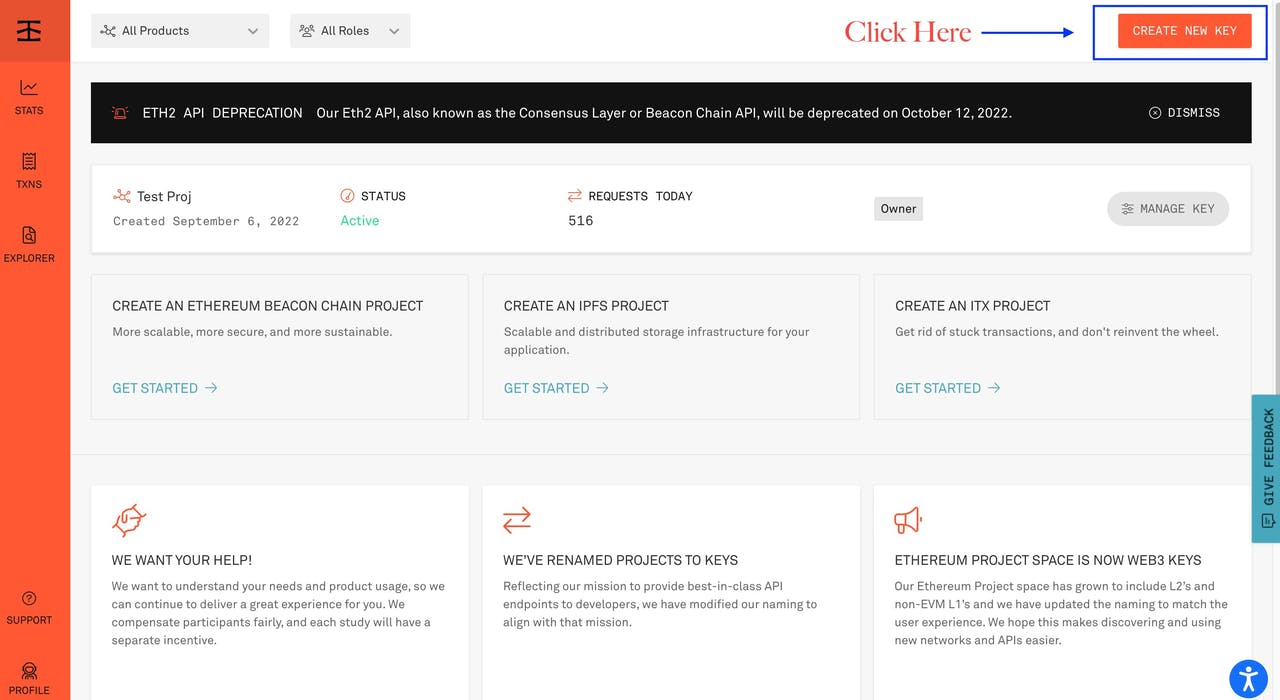
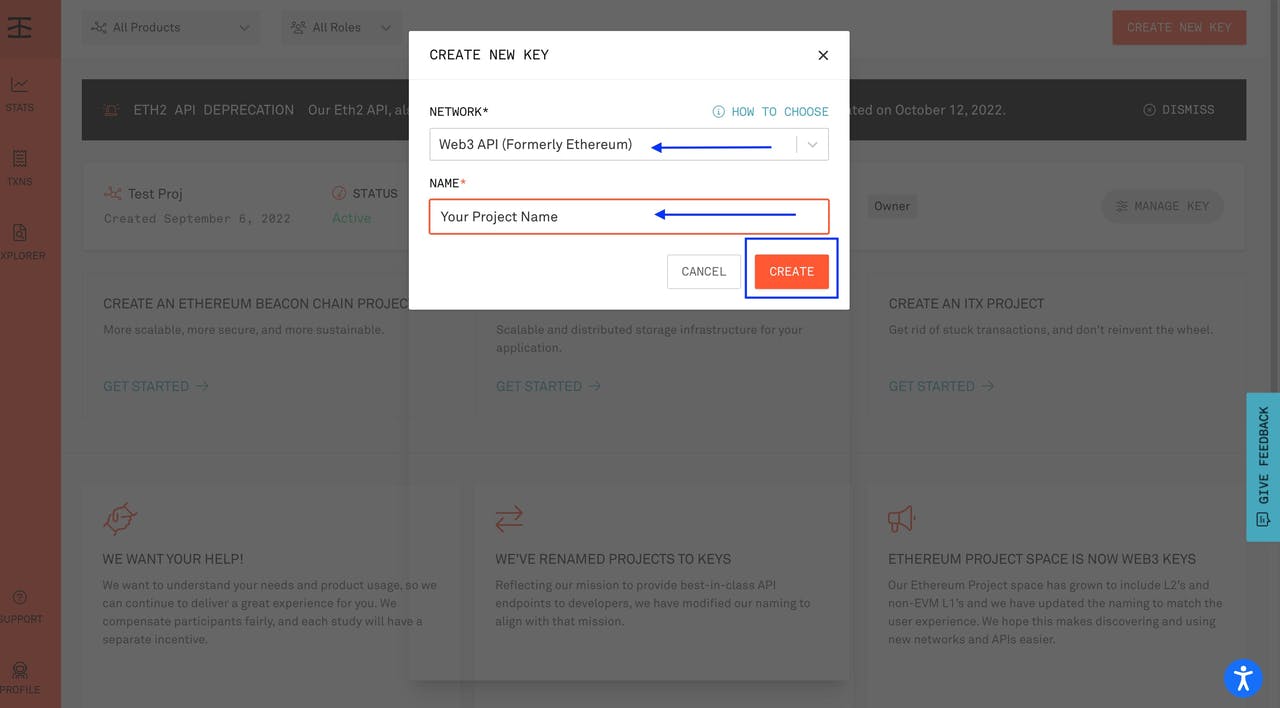
Click the “Create a New Key” button and fill in the required information.
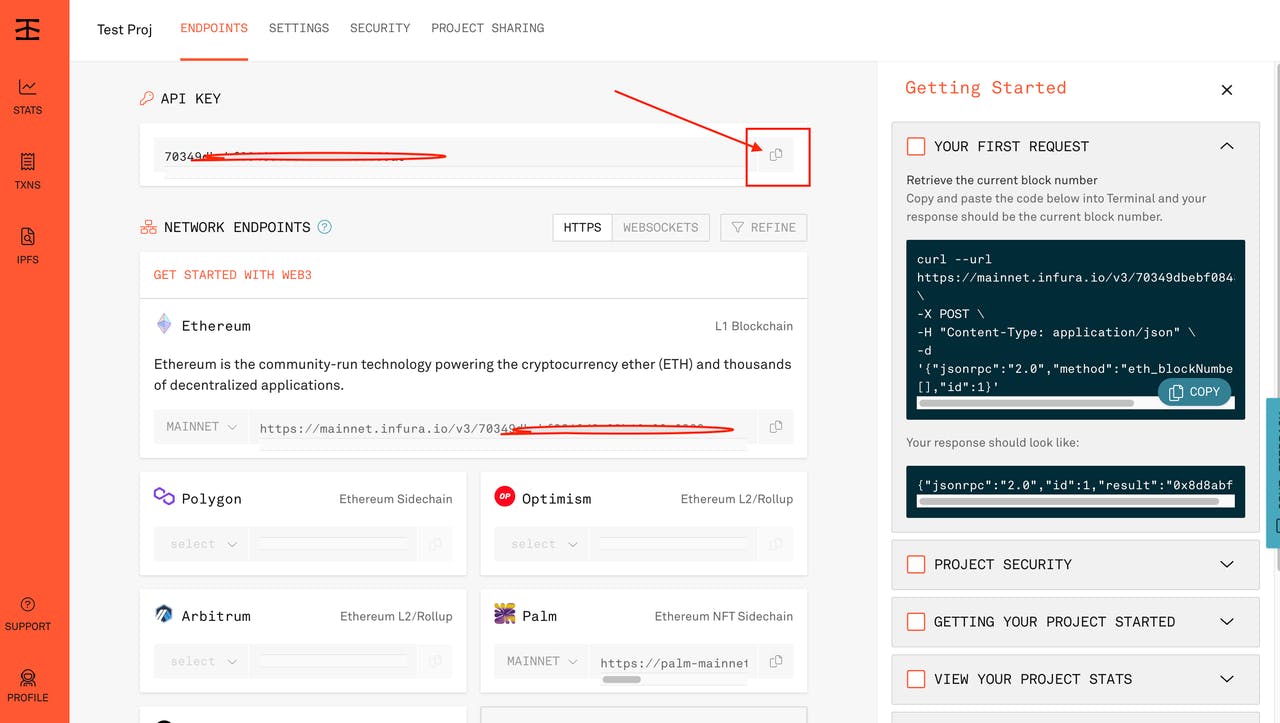
After creating your API key, your project ID will be visible on your dashboard under the API KEY section, as shown below. Copy and keep it somewhere; you will need it later in this tutorial.
Step 2 — Setup and Installation
Next we'll set up a Truffle Optimism Bridge Box. We can run the unbox command in any directory of your choice using the following command.
npx truffle unbox optimism-bridge <DIRECTORY_NAME>
Replace <DIRECTORY_NAME> with the directory name of your choice. Alternatively, you can install Truffle globally and run the unbox command.
npm install -g truffle
truffle unbox optimism-bridge <DIRECTORY_NAME>
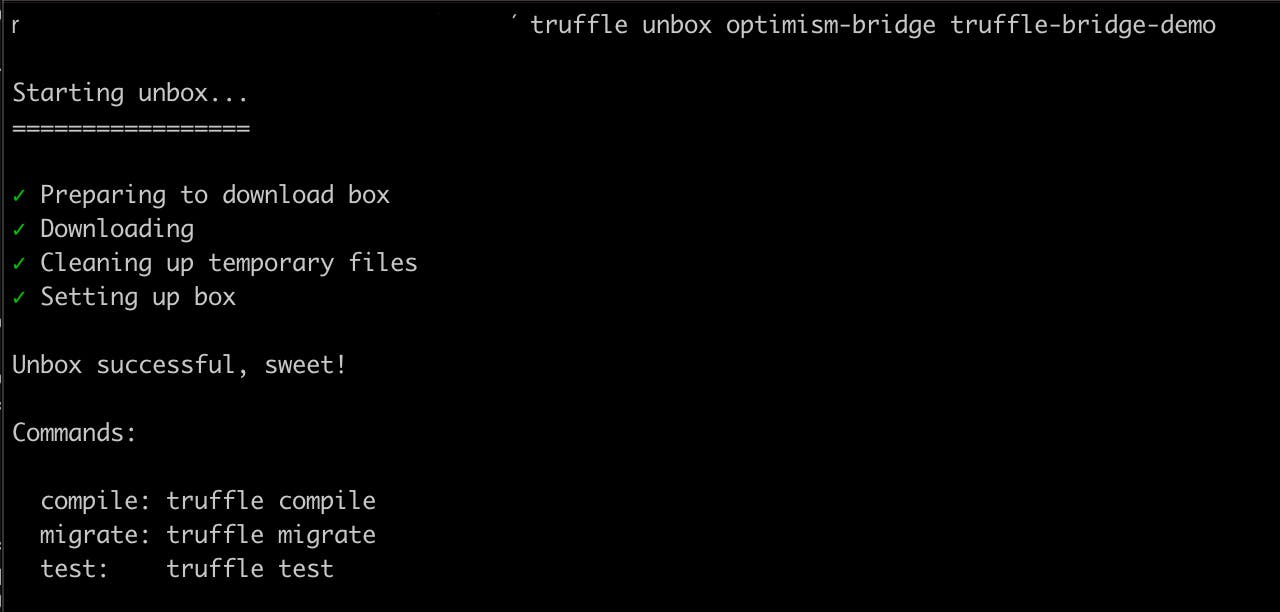
The command should download and run npm install as part of the unboxing process.
Now, run the following command to change the directory to the new one we just created.
cd truffle-bridge-demo
Note: truffle-bridge-demo is the name of our directory that was created.
We should have something similar to what appears below.

The .dotenv npm package has been installed, but we’ll need to add some information to the .env file created after unboxing. The truffle-config.ovm.js file expects a GOERLI_MNEMONIC value to exist in the .env file for running commands on the Ethereum Goerli and Optimism Goerli testnets and an INFURA_KEY to connect to the network.
GOERLI_MNEMONIC="<your-wallet-mnemonic>"
INFURA_KEY="<your-infura-key>"
Replace <your-infura-key> with the information we got earlier from our Infura dashboard. (Note: Never share your private keys (mnemonic) with anyone, and keep them secure). And replace <your-wallet-mnemonic> with your mnemonic as seen below:
To retrieve the mnemonic from Metamask, click the icon shown below on your Metamask.
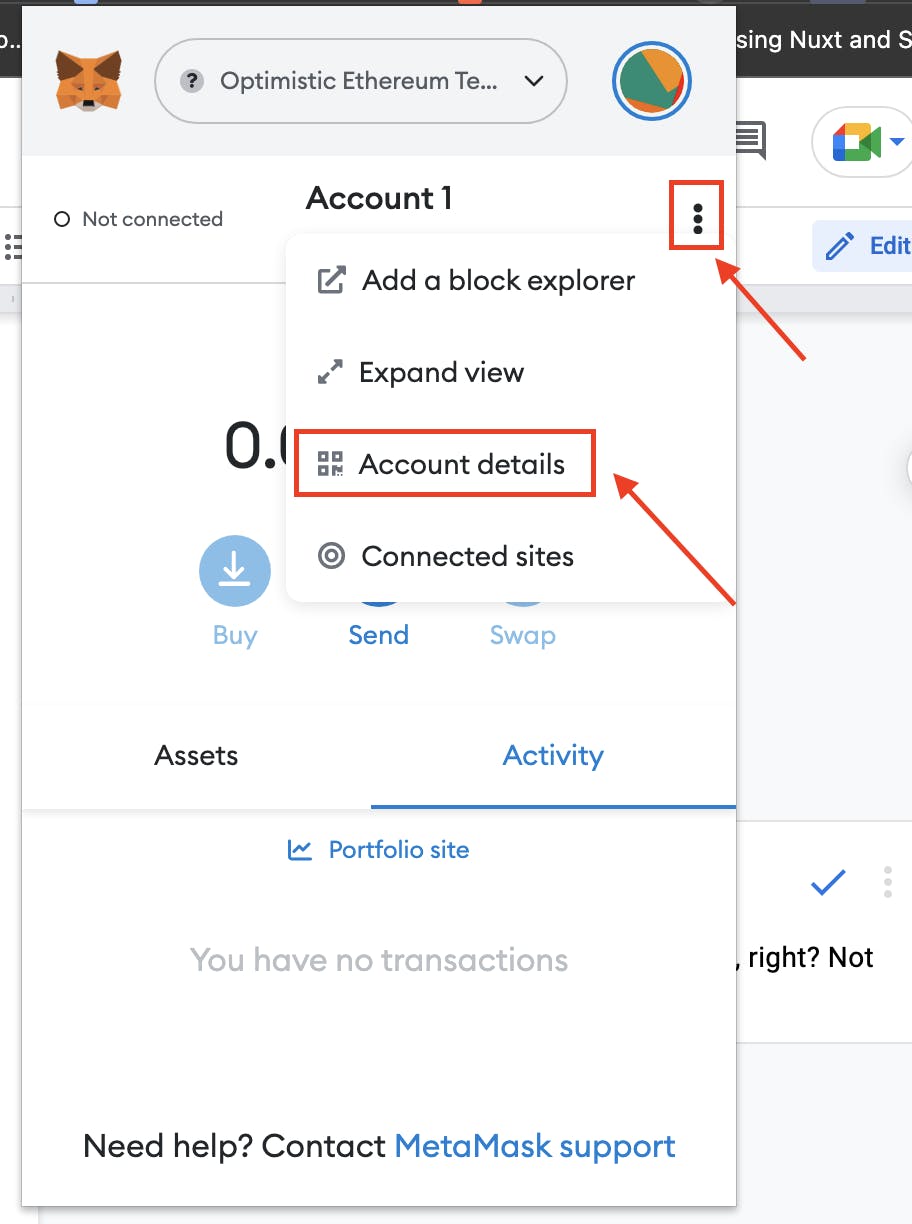
Next, click the Export Private Key button to copy the mnemonic.
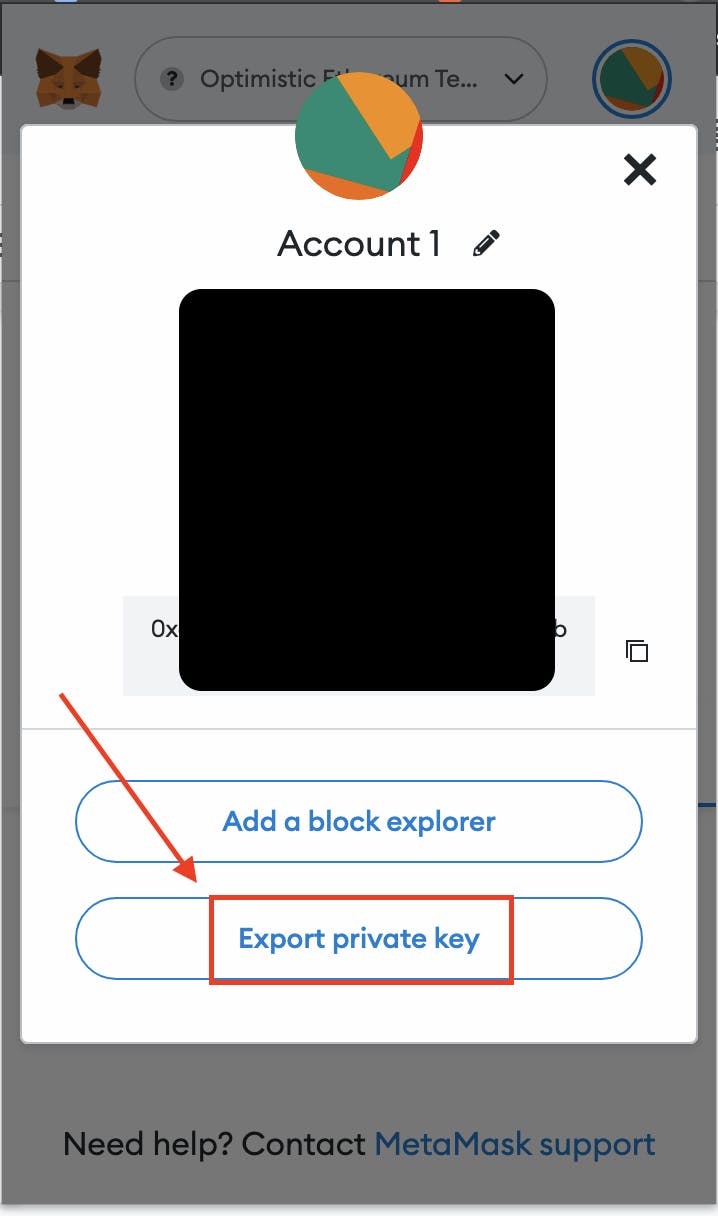
Git ignores the .env file in this project to help protect your private data. It is good security practice to avoid disclosing your private keys to GitHub.
Step 3 — Bridging using Truffle L2 Boxes
When we unboxed the project, all our project’s requisite contracts and scripts were created for us. In this next step, let’s walk through the individual contracts and the migrations to understand how bridging and interactions happen between the networks.
The contract contract/ethereum/GreeterL1.sol shows you how to send a message over the Optimism bridge from L1 to L2.
//SPDX-License-Identifier: Unlicense
// This contract runs on L1, and controls a Greeter on L2.
pragma solidity ^0.8.0;

import { ICrossDomainMessenger } from
    "@eth-optimism/contracts/libraries/bridge/ICrossDomainMessenger.sol";

contract GreeterL1 {
    address crossDomainMessengerAddr = 0x5086d1eEF304eb5284A0f6720f79403b4e9bE294;


    address greeterL2Addr = 0xC0836cCc8FBa87637e782Dde6e6572aD624fb984;


    function setGreeting(string calldata _greeting) public {
        bytes memory message;


        message = abi.encodeWithSignature("setGreeting(string)",
            _greeting);


        ICrossDomainMessenger(crossDomainMessengerAddr).sendMessage(
            greeterL2Addr,
            message,
            1000000   // within the free gas limit amount
        );
    }      // function setGreeting


}          // contract GreeterL1
The migration migrations/3_set_L2_greeting.js uses the above contract to send a message from Ethereum to Optimism.
var Greeter = artifacts.require("GreeterL1");


/**
 * Set L2 Greeting
 * Run this migration on L1 to update the L1 greeting.
 */
module.exports = async function (deployer) {
  console.log("Updating the L2 Greetings contract from L1! 👋👋");


  const instance = await Greeter.deployed();
  const tx = await instance.setGreeting("👋 Greetings from Truffle!");


  console.log(`🙌 Greeter txn confirmed on L1! ${tx.receipt.transactionHash}`);
  console.log(`🛣️  Bridging message to L2 Greeter contract...`);
  console.log(
    `🕐 In about 1 minute, check the Greeter contract "read" function: https://goerli-optimism.etherscan.io/address/0xC0836cCc8FBa87637e782Dde6e6572aD624fb984#readContract`
  );
};
Next, the contracts/optimism/GreeterL2.sol contract sends a message in the other direction (L2->L1) over the Optimism bridge.
//SPDX-License-Identifier: Unlicense
// This contract runs on L2, and controls a Greeter on L1.
pragma solidity ^0.8.0;


import { ICrossDomainMessenger } from
    "@eth-optimism/contracts/libraries/bridge/ICrossDomainMessenger.sol";


contract GreeterL2 {
    address crossDomainMessengerAddr = 0x4200000000000000000000000000000000000007;

    address greeterL1Addr = 0x7fA4D972bB15B71358da2D937E4A830A9084cf2e;


    function setGreeting(string calldata _greeting) public {
        bytes memory message;


        message = abi.encodeWithSignature("setGreeting(string)",
            _greeting);


        ICrossDomainMessenger(crossDomainMessengerAddr).sendMessage(
            greeterL1Addr,
            message,
            1000000   // irrelevant here
        );
    }      // function setGreeting


}          // contract GreeterL2
The migration migrations/4_set_L1_greeting.js uses the above contract to send a message from Optimism to Ethereum.
require("dotenv").config();
const sdk = require("@eth-optimism/sdk");
const ethers = require("ethers");
const Greeter = artifacts.require("GreeterL2");
const goerliMnemonic = process.env["GOERLI_MNEMONIC"];
const infuraKey = process.env["INFURA_KEY"];

const sleep = (milliseconds) => {
  return new Promise((resolve) => setTimeout(resolve, milliseconds));
};


/**
 * Set L1 Greeting
 * Run this migration on L1 to update the L1 greeting.
 */
module.exports = async function (deployer) {
  const newGreeting = "👋 Greetings from Truffle!"; //<---- CHANGE THIS VALUE TO YOUR NAME!!!
  const instance = await Greeter.deployed();


  console.log("Updating the L1 Greetings contract from L2! 👋");

  const tx = await instance.setGreeting(newGreeting);
  const txHash = tx.receipt.transactionHash;


  console.log(`🙌🙌 Greeter txn confirmed on L2! ${txHash}`);
  console.log(
    `🛣️  Bridging message to L1 Greeter contract.\n 🕐 This will take at least 1-5 min...`
  );


  // Set providers for Optimism sdk
  const l1Provider = new ethers.providers.JsonRpcProvider(
    "https://goerli.infura.io/v3/" + infuraKey
  );
  const l2Provider = new ethers.providers.JsonRpcProvider(
    "https://optimism-goerli.infura.io/v3/" + infuraKey
  );


  // Connect an L1 signer
  const wallet = ethers.Wallet.fromMnemonic(goerliMnemonic);
  const l1Signer = wallet.connect(l1Provider);


  // Initialize sdk messenger
  const crossChainMessenger = new sdk.CrossChainMessenger({
    l1ChainId: 5,
    l2ChainId: 420,
    l1SignerOrProvider: l1Signer,
    l2SignerOrProvider: l2Provider,
  });

  let statusReady = false;

  // Sleep for 1 min during L2 -> L1 bridging
  await sleep(60000); // 60 seconds

  // Poll the L1 msg status
  while (!statusReady) {
    let status = null;
    status = await crossChainMessenger.getMessageStatus(txHash);
    statusReady = status == sdk.MessageStatus.READY_FOR_RELAY;
    if (!statusReady) {
      console.log(
        "Message not yet received on L1.\n 🕐 Retrying in 10 seconds..."
      );
      await sleep(10000); // 10 seconds
    }
  }


  console.log("📬 Message received! Finalizing...");

  // Open the message on L1
  finalize = await crossChainMessenger.finalizeMessage(txHash);
  console.log(
    `🎉 Message finalized. Check the L1 Greeter contract "read" function: https://goerli.etherscan.io/address/0x7fA4D972bB15B71358da2D937E4A830A9084cf2e#readContract`
  );
};
In the scripts directory, we also have goerli_bridge_message.mjs and goerli_bridge_value.js to automate the process of compiling contracts, running migrations, and sending messages.
Step 4 — Complete compilation, migration, and bridging of a contract between Ethereum Goerli and Optimism Goerli
Next we'll actually deploy our contract out to Goerli. The helper script facilitates the compilation, migration, and bridging of messages between Ethereum Goerli and Optimism Goerli. On those networks, we'll need testnet ETH to use it. To receive some, use a faucet. We will also need to add the Optimism add-on to your Infura account.
Next, we will run the following command to start the project.
npm run deploy
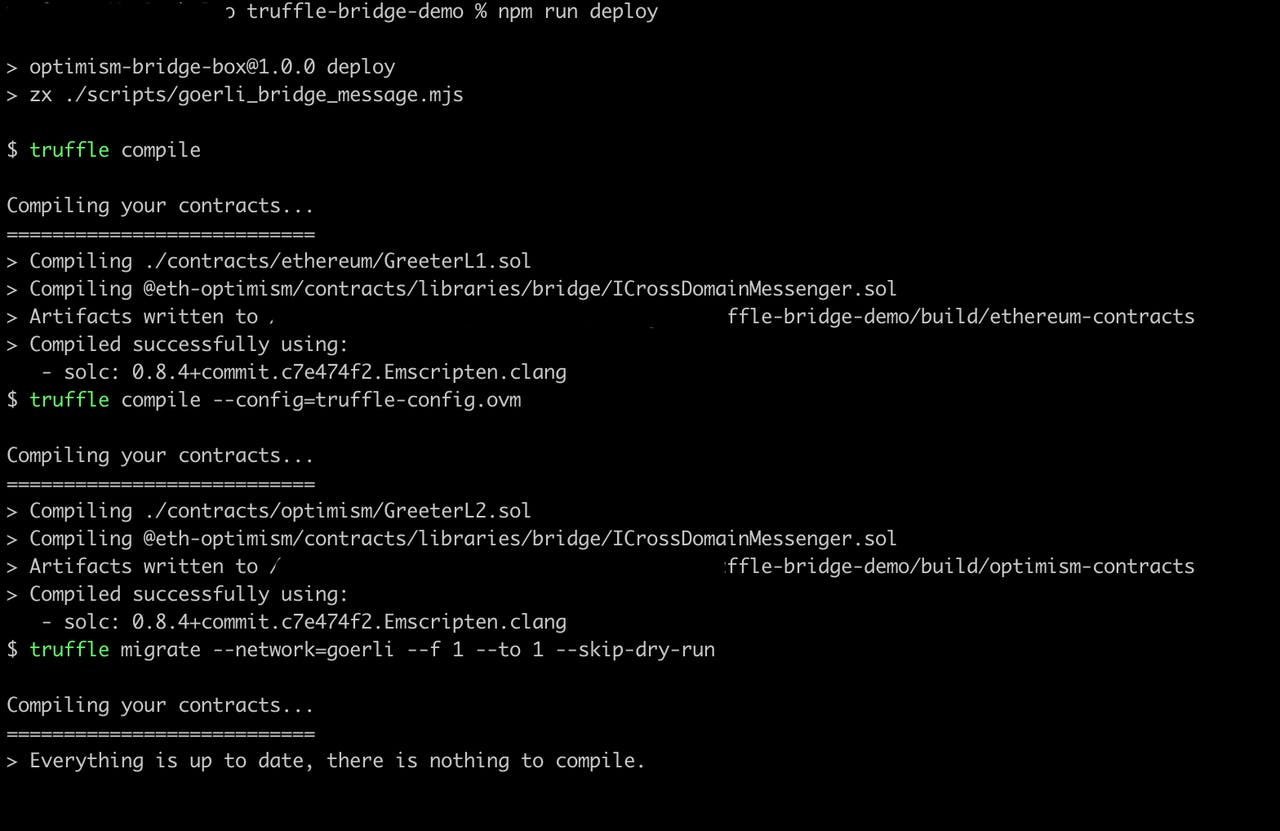
Below is a URL to confirm (through Etherscan) the bridged message after the complete migration.

A link to confirm the bridged message via Etherscan will be provided upon completion of the 4th migration.

Step 5 — Verify project is successfully on the Goerli testnet with Block Explore
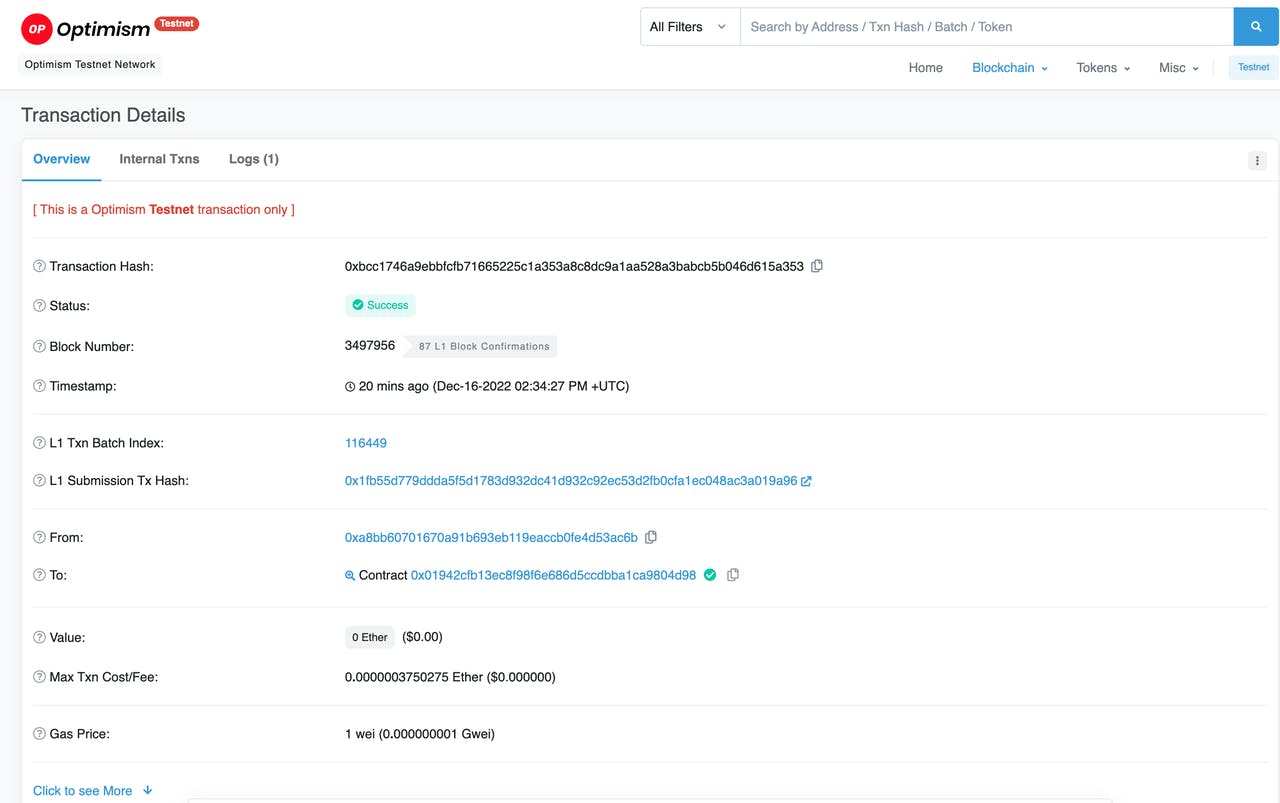
We have successfully set up, installed, built, deployed, and walked through the project we unboxed earlier. Next, we will verify the project on the Goerli Ethereum testnet.
Head to the Goerli Etherscan block explorer and paste the txn address 0xbcc1746a9ebbfcfb71665225c1a353a8c8dc9a1aa528a3babcb5b046d615a353 that showed on our CLI when deploying.

Conclusion
A multi-chain web3 world is crucial if we want the user and developer experience to continue to improve. And to achieve that, we need ways for dapps to communicate between chains quickly and seamlessly. Hopefully the example we walked through using the Optimism Bridge Truffle Box showed you a relatively easy and fast way to get started. To learn more, check out the official documentation.
Have a really great day!
